Automated Image Exports with FinishLynx
This article explains how to automatically export images from FinishLynx.
Description
As you click images in FinishLynx, AthleticLIVE Local automatically exports an image from one of your cameras. Images are branded with your logo (if you have an Enterprise site) and the AthleticLIVE logo.
There are two kinds of images:
- Athlete Images (Focused on a single athlete): Each athlete has an ID, so we can associate the image with a particular result. Images appear next to corresponding results on the live scoreboard and on final results.
- Event Images (A wide picture capturing top finishers): An image is taken as soon as all entries are marked in Lynx for a given heat. All images for a given round will appear on the corresponding event page.
Requirements
The following software is required to send FinishLynx running time to AthleticLIVE.
- FinishLynx
- FinishLynx Remote Control Plugin
- AthleticLIVE Local 2.3.1 or greater. You are not required to send FinishLynx and HyTek data via AthleticLIVE Local, but it must be enabled in order to send images to our servers.
- Email ben@athletic.net if you want to use this functionality. We need to enable it on your account.
Part 1: Configure Image Export Settings Defaults
A few settings are required to connect AthleticLIVE Local and FinishLynx. You can define default settings in your account instead of having to add them for every meet.
- Go to admin.athletic.live/admin/account.
- Under Image Export Configurations, click "Add New".
- Fill in each field.
- Publish: If published, these settings will be copied to AthleticLIVE Local when you select a meet.
- Image Directory: Regardless of whether FinishLynx is being used on the same computer as AthleticLIVE Local, you must Map a Network Drive from the AthleticLIVE Local computer to the directory that contains FinishLynx images. (e.g. Y:). The directory must exist at the top level of the network drive. For example, Y:\ works, but Y:\images does not. You must map Y:\ to the [DIRECTORY]\images folder. If you need to map to a local drive on the same computer as AthleticLIVE Local, check this tutorial). Use the directions under "Map a drive with subst".
- Local Port: FinishLynx will send results to AthleticLIVE Local on this port. 6600 is a good default. (NOTE: If you are exporting images from multiple Lynx machines, you need a different port for each config.)
- FinishLynx IP: Enter the IP of the FinishLynx machine. If AthleticLIVE Local is running on the same machine as FinishLynx, enter 127.0.0.1.
- FinishLynx Remote Control Port: Enter the remote control port of the FinishLynx machine. This must be the same port you set in FinishLynx (See "Configure the Remote Control Plugin"). AthleticLIVE Local will use this port to request image creation.
- Generate Athlete Images: Do you want to export athlete images?
- Window Numbers: Enter a single window number to retrieve athlete images from (See "Choosing a Window").
- Identilynx Window Area: Use this window area when exporting athlete images from Identilynx cameras. Recommended value: -100%,-100%,100%,100%
- Line Scan Window Area: Use this window area when exporting athlete images from line scan cameras. Recommended value: -200r,-100%,200r,100%
- Generate Event Images: Do you want to export event images?
- Event Window Numbers: Enter a single window number to retrieve event images from (See "Choosing a Window").
- Event Identilynx Window Area: Use this window area when exporting event images from Identilynx cameras. Recommended value: -100%,-100%,100%,100%
- Event Line Scan Window Area: Use this window area when exporting event images from line scan cameras.
- When a camera's Image Orientation is set to "Left", we recommend -200R,-100%,2000R,100%
- When a camera's Image Orientation is set to "Right", we recommend -2000R,-100%,200R,100%
FAQs
- What is a "window number"? A window is one camera view when you're in a FinishLynx event, and every FinishLynx Window has a number. This number is not unique to a camera. It can change based on the layout of your camera images and in which position you have your camera images (e.g. Left, Right, Bottom). In almost all cases (unless you have modified your Window Layouts in Advanced Settings), Left is Window 1, Right is Window 2, and Bottom is Window 3. If you have modified your Window Layouts or cannot find your Window Number, see the "Test It" section. Try testing with different Window Numbers to find out which Window Number you want to use.
- What is a "window area"? The window area defines the size and shape of the image you want to export from FinishLynx. The provided defaults should work fine. If you want to learn more, go here (http://www.finishlynx.com/download/finishlynx-documentation/finishlynx-qsg/Remote-Control-Plugin-Commands.pdf) and read about the coordinate system starting on page 2 under the heading "Image Commands".
Part 2: Configure FinishLynx
Configure the Remote Control Plugin
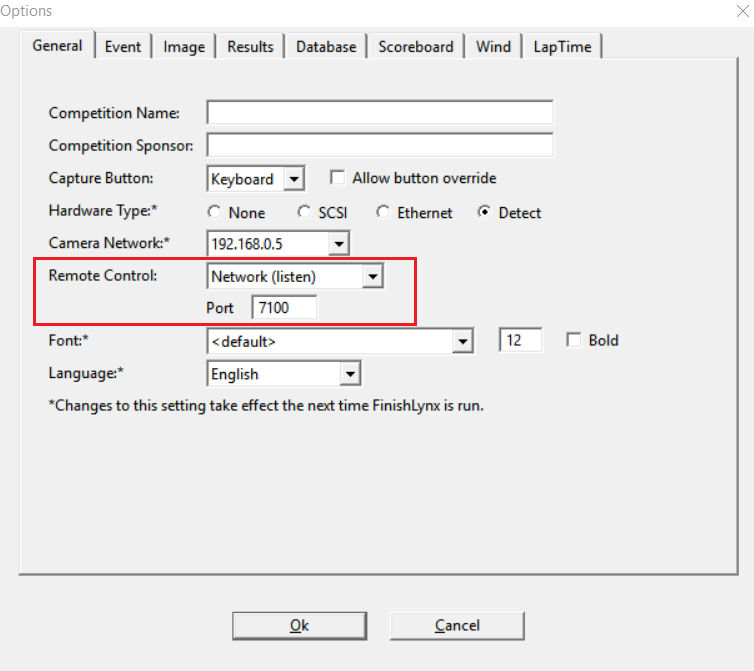
- Go to File -> Options -> General.
- Set Remote Control to "Network (listen)".
- Set the Port as defined in your settings. Use 7100 unless that port is already in use by another program (It probably isn't).
Set up a scoreboard to send results to AthleticLIVE Local
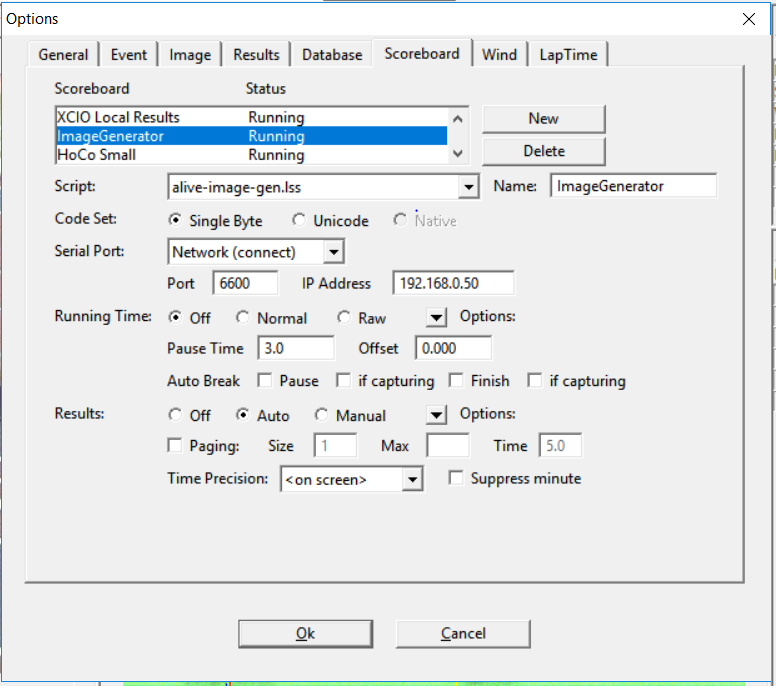
FinishLynx must tell AthleticLIVE Local when a result is ready for image export via this scoreboard.
- Script: alive-image-gen.lss
- Serial Port: Network (connect)
- Port: Use the Local Port defined in your Image Export Settings Defaults.
- IP Address: Enter the IP address of the computer running ALive Local
- Running Time: Off
- Results: Auto (Uncheck Paging)
- Results -> Options: Always Send Place must be checked.
Output Directory
Images are exported to the Output Directory in File -> Options -> Database -> Output Directory. If you change this value, you must restart FinishLynx.
Part 3: Configure your Meet Management System.
- To export athlete images, athletes must have competitor numbers.
- Upload a roster with competitor numbers before the meet begins HyTek MeetPro.
- Results must contain competitor numbers. This happens by default in MeetPro. In HyTek, you must go to Run -> Preferences -> Web Real-Time and check "Include Competitor number".
Part 4: Configure your AthleticLIVE meet
- Edit your meet at admin.athletic.live.
- At the bottom of the form under "Other Settings", check "Export Lynx Images and Show in Results?". If you do not see this checkbox, email ben@athletic.net. We need to turn this functionality on for your account.
- Save the meet.
Part 5: Configure AthleticLIVE Local
- Open AthleticLIVE Local (2.3.1 or greater).
- Select an active meet.
- You should see your Image Export Configs on the homepage. You can also click "FinishLynx Image Export" in the left-hand menu to see your configs.
- Map this computer to the FinishLynx Output Directory. Make sure the drive letter matches the Image Directory in your config.
Starting the process
When everything is ready, click "Re(start)" next to a config.
Test It
Use the Testing feature to make sure your connection works and to get your images as perfect as possible.
- Open a previously-saved FinishLynx race.
- In AthleticLIVE Local, click "Test" next to any Image Export Config.
- Choose the type of images you want to test, enter the time you want to export from, and click "Submit".
- If everything worked, you will see 1 or more file URLs that start with "file:///". Copy and paste this file URL into your browser or Windows Explorer to see the image.
- Try another test with a different time.
- If something goes wrong, copy the data under "Debug" and send to ben@athletic.net.
Turn it On
Check out our Day of Meet Checklist for a repeatable process you can use at every meet.
Recap
It takes a little while to set up. But once you set it up, you'll be automatically generating branded Lynx images for every click in FinishLynx.
Email ben@athletic.net with any questions.
Notes
- AthleticLIVE Local exports a athlete images one at a time. If you open a Lynx race with 150 finishers, AthleticLIVE Local won't export any. You have to start from a clean slate and as you click finishers one at a time, AthleticLIVE Local will export those images.
- Event images are only generated when every athlete has a place, be it a valid numerical place or DNS, DQ, etc.